Showing posts with label sugar paste. Show all posts

Wednesday, 1 January 2014

Festive Wedding Cake

Hello and Happy New Year! I hope you have all managed to escape the flooding and power cuts the recent weather conditions have resulted in - we have been blessed in our part of Dorset, so, so lucky.
 
One of my New Year's resolutions is to catch up on my blog posts - I have a backlog of craft/cake projects to put on...here is the first!
 
I was recently asked to make a wedding cake for my Boss's sister - the brief was to make it festive with a cranberry/silver and white colour palette with a touch of holly, making a sugarpaste ribbon the feature on the top tier...
 
To create the ribbon loops, I mixed some Gum Tragacanth (a plant derived powder which is used to stiffen sugarpaste, making it set harder and hold it's shape), into the cranberry paste, wrapped it in clingfilm and left it overnight. I then created the loops from lengths of paste and secured a cocktail stick into the end of each loop using a little cool, boiled water, shaped them and left them to dry out.


I opted to use the cocktail sticks as the cake had to be transported across country
and they prevented the loops from slipping!
 
 
What I love about cake decorating, is that each cake teaches me something different and
new and inspires me to try out more techniques!
 
Thank you for looking
Have a great 2014!
 
Jill x


Tuesday, 12 November 2013

Jewellery Birthday Cake


Phew, things have been a little crazy to say the least – I have a backlog of creative projects to blog about and no time to do it! Anyway, here are some photos of a cake I made for my friend Kerry’s birthday the other week.  I wanted to try out using jewellery as a cake topper – I have seen some amazing designs by cake artists online, LindySmith for example. I have to say, I love the effects that you can achieve with a little jewellery wire and beads. I will definitely be using this technique again!


You will have to excuse the lighting - I have about 10 minutes to take the shot before I
delivered the cake and I had very little natural light!


To create the topper, I selected a variety of purple tones and crystal beads in an assortment of designs and sizes then threaded them onto some 26 guage gold wire. I then looped the wire around the beads to hold them into place. I made the twirly bits by wrapping the wire around a pen, then secured all the ends into a flower pic, which was already inserted into the cake. If you stuff the flower pic first with a little sugar paste, it will hold the wires steady.


The cake design was inspired from the label of a bottle of bubble bath! I used a mixture of
silicone molds and Little Venice Cake Company nozzles to create the paisley effect. I loved the dimensional result, but make sure you allow plenty of time for this technique as it can take ages!


 Thank you for looking!

Jill x

Tuesday, 27 August 2013

Ombre Ruffle Rose 80th Birthday Cake

Hi, I feel a little rusty as have not had a chance to blog for a while but here goes!
I was asked a while ago to make a pretty 80th birthday cake using a colour palette of lilac
and pink and here's what I came up with...

 
The ruffles are really easy to make (and quite addictive too!). I simply cut lengths of sugar paste then used a ball tool to ruffle the edges. I then stuck them to the cake sides from top to bottom using a little water as adhesive. To create the depth of ruffle, I concertinaed the strips as I stuck them on.
 
 
To create the ombre effect, I used a graduation of colours from top to bottom.
To get the colours right, I found it much easier to create a range of coloured sugar paste balls first and lie them next to each other on my worktop. Start light then darken to suit until you get the perfect colour mix.
 
 
I created the roses by making a cone of sugar paste for the centre, then wrapping cut circles
of thin sugar paste around it, tweaking the petals as you go to achieve a natural shape.
The roses were left to dry on greaseproof paper in a Yorkshire pudding tin, then dusted with
edible pearl lustre for a pretty sheen.
 
The 80 was made but pressing a Papermania 8 and 0 clear backed stamp into a thick section of rolled sugar paste, which I then cut out, left to dry, added the sheen and mini flowers.
 
 
I made the mini flowers using a metal cutter and molded them to a 3D shape and
used these to decorate the 80 and fill in any gaps!
 
 
Thank you for looking!
 
I would like to enter this cake into the Craft Blogging Central August challenge (I know it is not specifically craft but it is sugar craft so it may count!)
 
Jill x


Sunday, 19 May 2013

Fordson Super Dexta Sugar Paste Challenge!

My lovely husband has an interesting hobby - he spends most weekends in the autumn (a few are creeping in in the spring now as well!), ploughing up farmer's fields, along with many others, the aim being to win a trophy!

It may sound a little mad to many of you - these boys go out regardless of weather - but I have to say, after having a little dabble pre-kids, I do get it. It is exhausting but the sense of satisfaction at the end puts you on a high! There is an extraordinary sense of community, support and encouragement from the fellow ploughmen (and women), and at the end of the day, these colourful characters are helping to preserve a tradition, which would soon otherwise be lost.

To celebrate this, I set myself the challenge to create my hubby's Fordson Super Dexta and plough in sugar paste as the centre-piece of his birthday day (45, bless him!). It had me up late but I loved every minute of it...I used the modelling tools from the Little Venice Cake Company which were fabulous when constructing the tractor and plough! I also used their Deep Circle Cutters to create the wheels.

 
I made a few mistakes along the way - I was too eager to get going with the model that I tried to use a liquid food colour to get the blue. After using nearly half the bottle, the resulting sugar paste hasn't dried quite as I would have liked it, but it worked (note to self - concentrated colour next time!)
 
 
I also forgot to take off the plastic wrap from the cake board in my haste to get on with things!
 
 
I would also have covered the board with a square of textured sugar paste before
I put the cake on; it would have been so much easier!
 
 
However, I was pretty pleased with the overall effect, and every cake made is another
lesson learned for next time!
 
I used the following Little Venice Cake Company piping nozzles...
 
No. 22 To achieve the ploughed earth effect.
No. 47 To achieve the wooden fence effect.
No. 233 To achieve the stubble effect.
 
 
I find that it's the little details that you add to the cake that give it it's character. In this case, my hubby's faithful lunchbox, sighting poles and match contestant number (his age) that did the trick!
 

I made a plaque from two layers of sugar paste to add my message (although the writing could have been better, I did this very late at night with tired eyes!).


The girls added their own touch at the end - some personalised trophies and plaques!
The cake itself was a gluten free chocolate sponge with chocolate frosting, buttercream and sugar paste used to fill and decorate it. Every slice is filled to the brim with calories, but it did taste good!
 
 
Jum was really chuffed with it which made all the work worthwhile! A rough guess would say it took about 15-18 hours in total (this includes a lot of washing up time too!).
 

Adding the candles actually brought the tractor to life!


The sad bit...!
 

...and there it was, going, going, gone!
 
I hope you have enjoyed reading this post. It would be lovely to hear what you think!
 
Jill x


Monday, 22 April 2013

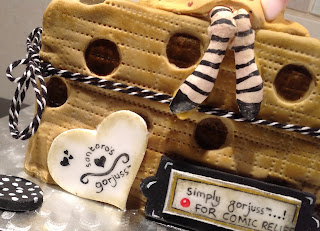
Gorjuss gluten free sponge cake for Comic Relief

I have finally got around to putting together the step by steps on how to make my Comic Relief cake featuring the girl from the brand Gorjuss! They are featured in full on the docrafts.com website...

http://www.docrafts.com/project/Gorjuss-Cake/p3509553/tStepByStep

The cake was completely edible (apart from the ribbon!), gluten free and won the Comic Relief Bake Off which was fantastic! It took about 9 hours to do from start to finish, but would probably be much quicker for someone following the step by steps. I did an hour or so here and there (between work, school runs and housework!), and it didn't seem that long - I was surprised when I added it all up! If you have any links to projects you have done using sugar paste, I would love you to paste them into a comment. I have completely got the cake making bug now - I  am dreaming up one for my hubby next month, that will be a challenge!


The finished cake


Thank you for looking!

Jill x
 

Sunday, 14 April 2013

Sugar paste bear TUTORIAL


My finished bear!
I was recently handed the challenge of making a 3D bear from sugar paste to go onto my Grandma's birthday cake - here’s how I did it (with help from a couple of enthusiastic
little girls of course!)...
 
My little helpers!
 
You will need;
Sugar paste & icing sugar (or cornflour)
Cream, dark brown and pink colouring
Mini rolling pin
Sugar paste round ended tool
Cocktail stick, spaghetti and paintbrush

How to;
My bear was about 8cm tall, however, the same technique could be used for any sized bear.
1. Roll a ball of cream sugar paste for the body. Stick a length of spaghetti into the middle – this will act as a support for the head.

2. Roll a ball for the head and slightly flatten to create an oval. Stick onto the spaghetti.

3. To make the ears, roll a small ball and flatten with your thumb, cut in half, stick to the side of the bear’s head using cool, boiled water.


4. Make another small ball for the nose section and flatten, stick to the front of the bear’s face. Add a small dark brown nose to the top half.

5. To make the arms, create two cylinders of paste and roll one end gently between your fingers to create a tapered end. Mold them to the side of the bear, using cool boiled water as adhesive. 
 
 
6. Repeat for the legs with slightly larger cylinders. Flatten the large ends to create feet.


7. Add small half circles of pale pink paste to the inside of each ear and flat circles of pale pink to the feet. Use the rounded end of a sugar paste tool to create the pad indents. Add two small brown eyes and paint on a mouth.

 
9.The ribbon (optional). Roll a thin length of dark pink sugar paste and wrap it around the bear’s neck.
Roll and cut out two short lengths of dark pink paste, cut the end of each so that it is on the diagonal and stick these onto the front of the bear to create the ribbon ends.

To create the ribbon loops, roll out and cut two rectangles from the same colour paste. Create the loops by joining the ends of each together leaving a gap between the two layers. Stick these onto the bear’s neck.
To finish, cut a short rectangle and wrap it around the ribbon joins to create the finished bow.

10. Add texture to your finished bear and ribbon using the end of a cocktail stick!
My girls loved doing this - here are their finished bears (with pink dresses of course!)
 
 
If you have made any 3D characters, flowers or whatever with sugar paste, leave me a comment and paste in a link -
I would love to see them!
 
Jill x
 

You might also like