Showing posts with label Gluten Free Naked Cake. Show all posts

Tuesday, 3 May 2016

Birdhouse Celebration Cake Tutorial

Think outside the box when it comes to using Embossing Folders! Check out how to create a beautiful dimensional wood grain effect onto modelling paste and turn it into a Birdhouse cake topper. Use modelling paste to make the birdhouse and birds as this dries harder than standard sugar paste. Use this technique to create your own birdhouse using dimensions and sizing to suit your cake.


1. Roll out cream coloured modelling paste to around 5mm thick. Level out with a Flat Smoother. Place a washed, clean wood grain effect Embossing Folder onto the paste with the embossed side face down. Firmly run your smoother over the top. Carefully lift up. TIP You can smear a little trex over the folder first if you find it sticks.


2. Use the large veining tool and round ended tool to press into the wood grain to create a really dimensional effect.
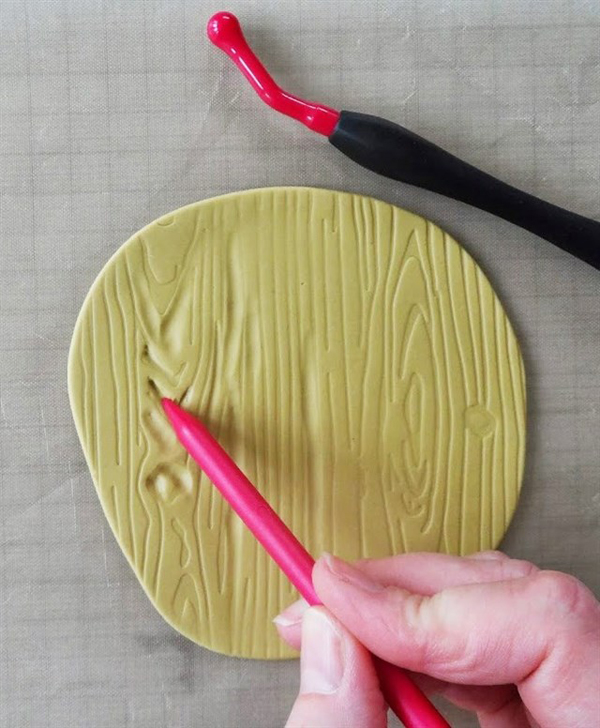

3. Make nail holes using the end of the veining tool.


4. Trim to size. You will need 2 square sides, 2 end pieces the same size but with the addition of a pointed top section, 2 rectangular roof pieces plus a base to sit your house on. TIP Make up a template from card first and use this as a cutting guide. Use the end of a piping nozzle to cut a hole through one of the end pieces to make the bird door. Use the round ended tool to press in a hollow just underneath. Make a bird stand using a cylinder of modelling paste then stick it into the hollow.


5. Make a stand for your house to sit on - secure 4 dowelling rods together and wrap the top 5cm in wood grain effect paste. Leave all your elements to dry out on a cooling rack, preferably in an airing cupboard.


6. Make a flying bird, sitting bird and bird head from white modelling paste. Keep the shapes nice and simple and use the modelling tools to add indentations to the wings and body. Stick together with sugar glue. TIP You may like to attach the wings into the body using a little florist wire. Add wire legs and feet to the sitting bird and a strong length of wire into the flying bird’s tummy. Secure with sugar glue. Leave to dry out. NB Do not eat the birds with wire inside.


7. Paint thinned down edible concentrated brown food colouring into the deepest wood grain grooves.


8. Before this dries out, use a small pad of dry kitchen roll to lightly rub over the paint, blending the brown. Leave to dry.


9. Add the paint around all the sides of your house sections as well as the bird stand.


10. Assemble the house using cream coloured royal icing. TIP Use a dry paintbrush to blend in any icing that squeezes out.


11. Assembling continued…


12. Once you have finished assembling the house, stick the bird head into the hole and leave to dry thoroughly.


13. Use concentrated edible food colour to paint the Blue Tits. TIP Use a dry brush to blend colours.


14. Standing bird….


15. Push your dowelled stand into the top of your cake. Make sure it is level. Use royal icing to stick on a cake board which is the same size (or slightly smaller) than the base of your birdhouse. Leave to dry.


Assemble your cake! Stick the birdhouse onto the stand. Push a flower pick into the first tier of your cake and insert the flying bird into it. TIP Add a ball of sugar paste into the pick first to make the wire more secure. TIP Make sure no wire is touching the cake – pop the sitting bird onto a small plaque of modelling paste and remove before eating.

I hope you enjoyed this tutorial!

Jill x

Sunday, 6 April 2014

Gluten Free Naked Cake!

I am being converted to loving the new trend of Naked Cakes which is getting more and more popular in the cake world. They skip the iced covering and show off the actual cake and filling in all their glory! You need to consider your cake and filling colour, flavour and consistency in a different way to when you cover cakes with icing - you can have no runny fillings or burnt edges - there is no room to hide!
 
Here is my first Naked Cake which I made for my Mum on Mother's Day. With three coeliacs at the tea party, gluten free vanilla sponges were the order of the day! I am a massive fan of Orgran Gluten Free Self Raising Flour - it is an ideal swop for normal SR flour- there is no difference in the taste or consistency and is so easy to use (I'll give you the recipe further down the post)...

 
 The beauty of Naked Cakes is that you can use simple decorations - I know I have combined flowers and fruit on this version, but assorted fruits and any other relevant edible offerings work perfectly. I sprinkled mine with a little icing sugar just before serving to get a lovely finish.

The flowers were made with gumpaste (sugarpaste mixed with Tyo powder in this instance) and shaped using the Little Venice Cake Company Modelling Tools and Mat. They were possibly the quickest flowers I have ever made as time was short (10pm the night before!) but I was happy with the overall effect. The flowers were wired and inserted into mini flower picks which were pushed
into the sponge at staggered heights.

 
Here's the gluten free recipe for 3 lots of 8" vanilla sponges (base tier) 
(swop the vanilla extract for other flavours if you wish)
 
12oz Soft Margarine (at room temperature)
12oz Golden Caster Sugar
6 Large Eggs (at room temperature)
2 tsp Vanilla Extract (spend more on a quality one such as Nielsen Massey -
it is worth the expense as it makes such a difference to the flavour)
 
Heat the oven to 180 0C then grease and line your cake tins (I used the Little Venice Cake Company Professional Grade Anodised Cake Tins as I love the quality). Cream the margarine and sugar together until fluffy then gradually add in the beaten eggs and vanilla extract. Sift in the flour and use a metal spoon to fold it onto the mixture. Divide the mixture equally between three tins and bake for 20 - 25 minutes until light golden brown and springy to the touch in the middle.
 
If you do not have three tins the same size, make each layer one at a time using freshly prepared mixture. It is worth the effort as the baking agents in the mixture can start to work whilst it sits in the bowl and can spoil the sponge.
 
For the top tier, use 6" tins and alter the quantities to 9oz of margarine, sugar and flour and 4.5 eggs
(add one egg to a cup, beat it then measure out half) - use the same amount of vanilla extract and bake for 15 - 20 minutes.


The cake was filled with beaten double cream and strawberry jam and went down a storm! Apparently, it even freezes well too (just as well as there was rather a lot to eat!). As you can see, I used Little Venice Cake Company Dowelling Rods to support the top tier and prevent it
squashing the base.
 
Thank you for looking - I would love your thoughts or ideas on naked cakes or gluten free baking!
 
Jill x

You might also like