Think outside the box when it comes to using Embossing Folders! Check out how to create a beautiful dimensional wood grain effect onto modelling paste and turn it into a Birdhouse cake topper. Use modelling paste to make the birdhouse and birds as this dries harder than standard sugar paste. Use this technique to create your own birdhouse using dimensions and sizing to suit your cake.

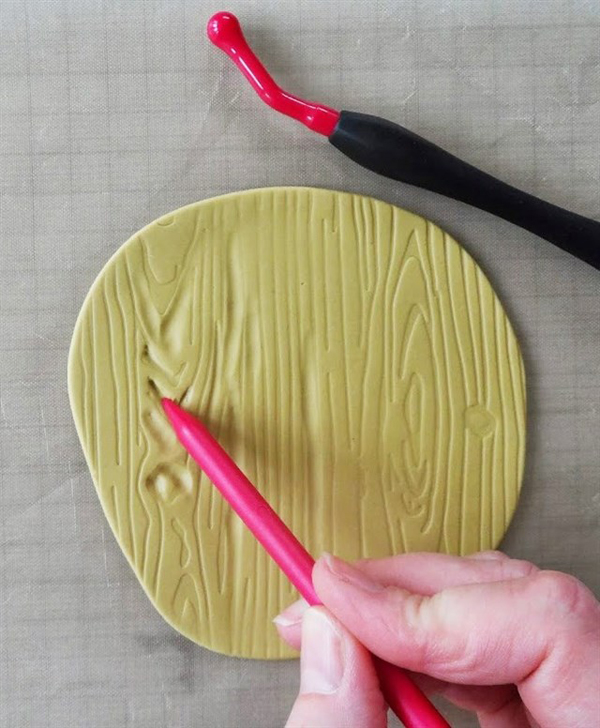
1. Roll out cream coloured modelling paste to around 5mm thick. Level out with a Flat Smoother. Place a washed, clean wood grain effect Embossing Folder onto the paste with the embossed side face down. Firmly run your smoother over the top. Carefully lift up. TIP You can smear a little trex over the folder first if you find it sticks.

2. Use the large veining tool and round ended tool to press into the wood grain to create a really dimensional effect.
3. Make nail holes using the end of the veining tool.

4. Trim to size. You will need 2 square sides, 2 end pieces the same size but with the addition of a pointed top section, 2 rectangular roof pieces plus a base to sit your house on. TIP Make up a template from card first and use this as a cutting guide. Use the end of a piping nozzle to cut a hole through one of the end pieces to make the bird door. Use the round ended tool to press in a hollow just underneath. Make a bird stand using a cylinder of modelling paste then stick it into the hollow.

5. Make a stand for your house to sit on - secure 4 dowelling rods together and wrap the top 5cm in wood grain effect paste. Leave all your elements to dry out on a cooling rack, preferably in an airing cupboard.

6. Make a flying bird, sitting bird and bird head from white modelling paste. Keep the shapes nice and simple and use the modelling tools to add indentations to the wings and body. Stick together with sugar glue. TIP You may like to attach the wings into the body using a little florist wire. Add wire legs and feet to the sitting bird and a strong length of wire into the flying bird’s tummy. Secure with sugar glue. Leave to dry out. NB Do not eat the birds with wire inside.

7. Paint thinned down edible concentrated brown food colouring into the deepest wood grain grooves.

8. Before this dries out, use a small pad of dry kitchen roll to lightly rub over the paint, blending the brown. Leave to dry.

9. Add the paint around all the sides of your house sections as well as the bird stand.

10. Assemble the house using cream coloured royal icing. TIP Use a dry paintbrush to blend in any icing that squeezes out.

11. Assembling continued…

12. Once you have finished assembling the house, stick the bird head into the hole and leave to dry thoroughly.

13. Use concentrated edible food colour to paint the Blue Tits. TIP Use a dry brush to blend colours.

14. Standing bird….

15. Push your dowelled stand into the top of your cake. Make sure it is level. Use royal icing to stick on a cake board which is the same size (or slightly smaller) than the base of your birdhouse. Leave to dry.

Assemble your cake! Stick the birdhouse onto the stand. Push a flower pick into the first tier of your cake and insert the flying bird into it. TIP Add a ball of sugar paste into the pick first to make the wire more secure. TIP Make sure no wire is touching the cake – pop the sitting bird onto a small plaque of modelling paste and remove before eating.
I hope you enjoyed this tutorial!
Jill x


